How To Create WooCommerce Coupons for SendPulse Automatically
If you haven’t already, you’ll want to check out the simple process for creating coupons in Urgency Coupons for Mailing Lists PRO, which you can find here. Once you’ve done that, come back here and learn how to set up SendPulse to start sending your personalized WooCommerce coupons to your list subscribers.
This tutorial shows you how to do this using SendPulse, a really great option for your email marketing needs.
Note that you’ll need to have a paid SendPulse account so that you can set up automations and create a Webhook.
1. Create Your Coupon in Urgency Coupons for Mailing Lists PRO
You’ll need to create a coupon in the WordPress Dashboard under Urgency Coupons for Mailing lists > All Urgency Coupons > New Coupon.
Fill out the various details about the coupon you wish to add, such as the value, amount, discount type, etc. The suffix is what will be added to their personalized email code.
Under Mailing List Provider, you’ll need to choose SendPulse. When you do this, you’ll note that a field is shown asking you to enter a code from SendPulse. You don’t have that yet but will soon.
Go ahead and save/publish your coupon. You’ll then see a Webhook URL which you’ll need to copy and use in Step 2. Also, we’ll be coming back to this coupon in a moment, so leave this tab open.
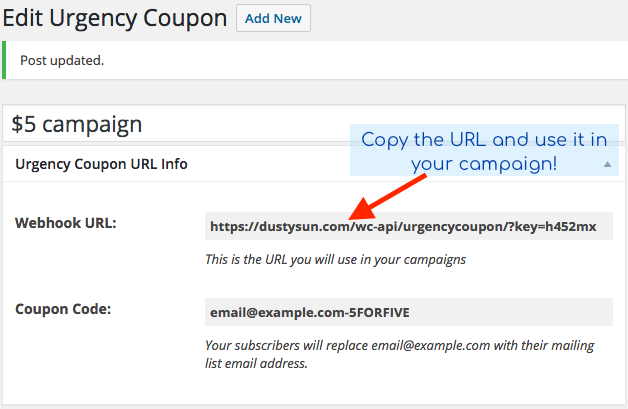
2. Set Up Your Automation in SendPulse & Add a Webhook
In SendPulse, you’ll need to create an automation if you don’t already have one. SendPulse has a lot of good documentation on doing that, and it’s pretty easy. Here’s a good link to get you started if you need.
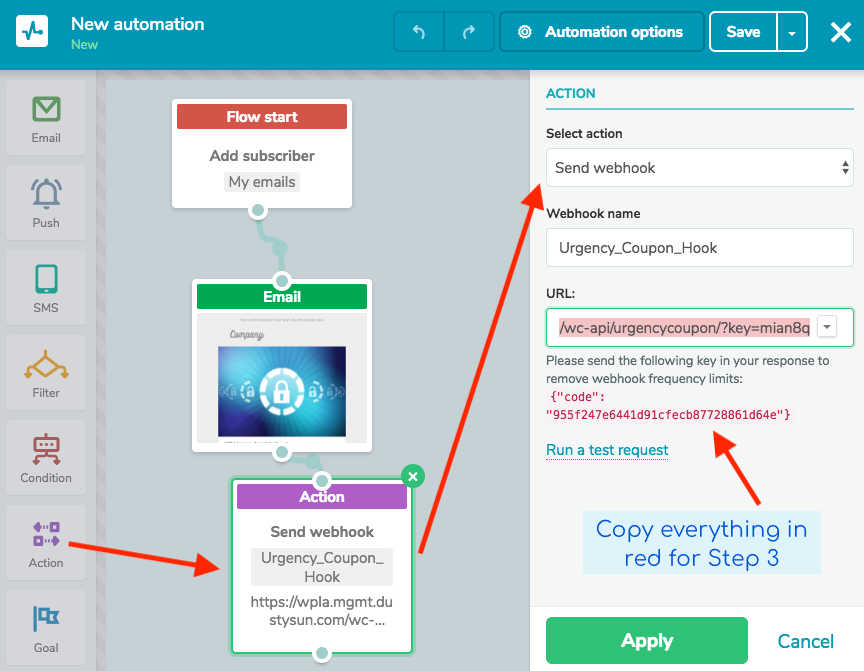
Once you have an automation, you’ll need to add a webhook from under the “Action” section on the left in the screen shown.
When you’ve added the webhook, you’ll see options on right side:
- Action: Send Webhook
- Webhook Name: [This is just for your use and can be anything]
- URL: Paste the Webhook URL you copied earlier in Step 1.
Note that below the URL setting, it says “please send the following key in your response…” Copy everything shown in red, including the brackets.
Keep this tab open, and go back to your coupon you created in Step 1.
3. Paste the SendPulse Code Into Your Coupon Settings
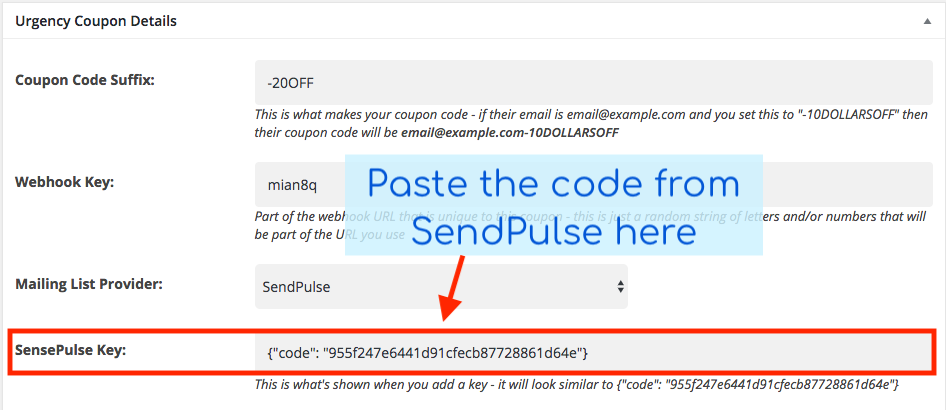
Head back over to the coupon you created in Step 1. If you closed it, that’s ok – just open it back up to edit it.
Scroll down to the section that says “SendPulse Key” and paste in the code you received from SendPulse. Make sure it begins and ends with brackets, and click Update to save your changes to the coupon.
4. Test the Webhook In SendPulse
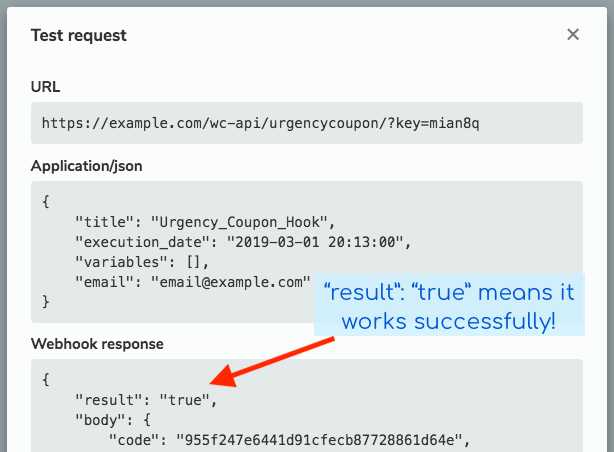
In your SendPulse settings, click the link that says “Run a test request.”
If everything was set up correctly, you should see a success message and a test coupon should have been created.
If it fails, make sure you put the proper webhook URL into the URL field in SendPulse, and make sure you copied the correct code from SendPulse and saved it in your coupon settings.
5. Personalize the email
In your SendPulse automation, edit the email and use a variable along with the coupon suffix you created in step 1 so that the personalized coupon code is shown to each of your subscribers who receive the email.
For example, if you created a suffix in step 1 called “-50DOLLARSOFF” then you would add {{email}}-50DOLLARSOFF to the email.
6. That’s a wrap!
You should now have a working automation in SendPulse that creates customized coupons for your subscribers and notifies each subscriber of their personalized coupon code.
Please reach out if you have any questions.